About This Tutorial: From long time I wanted to write this but was always running out of time as the topic is complicated and too long! I always like to come-up with simple ways of doing geekish things as this Devils Workshop have great variance in its audience. So writing a post for all is always cumbersome but still lets see how it goes.
Who Should Read This: This is for anyone who is new to firefox extension development. More accurately for the geeks who haven’t coded any extension for firefox yet! This is just to build foundation, to kick-start yourself!
About Example Covered: The example covered with this tutorial is a toolbar with just one feature: Google Search! And lets call it: GoogBar! (You can Download Source here)
Following Points are Covered: Firefox extension development can easily swamp many books (with scary volume numbers) we will try to cover following points…
- Section 0: Prerequisites, Tools & References
- Section 1: Basic File Structure Layout
- Section 2: Creating Metadata – Dealing with Important files
- Section 3: Creating Graphical User Interface – GUI
- Section 4: Implementing Backend functions
- Section 5: Packaging Extension for distribution!
- Section 6: Installing & Testing Your Extension!
Section 0: Prerequisites, Tools & References!
Prerequisites: Little knowledge of HTML/XHTML, XML, JavaScript, and CSS.
Tools: Any text-editor which supports HTML/Javascript/CSS syntax-highlighting will be great. I use vi/gedit (on Linux) and notepad (on Windows)
References: I started with tutorial at BornGeeK and still find it useful. In fact its greatness will reflect throughout this post. Still you may find these useful
- MozillaZine Extension development Article
- MozillaZine Extension Development Forum
- XUL Planet Element Reference
- Firefox Toolbar Tutorial by Born Geek
- Firefox Toolbar Tutorial by Extend Firefox
Section 1: Basic File Structure Layout
Lets go other way round – Outside-In!
Firefox extensions filename ends with xpi extension. For time being assume xpi = zip. In fact xpi is just zip archive! So what this archive contains?
It will contain atleast: 2 files – install.rdf & chrome.manifest + 1 folder – usually named chrome!
Firefox extensions require a specific internal file structure. To ensure this few files/folders will always have fixed place while optional files/components have little freedom to move around. Lets move ahead with an example extension: GoogBar so as keep track of extension development! Lets start by creating a directory – GoogBar and other files/folder structure under it as shown below…
+- GoogBar/
    +- content/
    +- install.rdf
    +- chrome.manifest
install.rdf & chrome.manifest are just plain-text file so create two empty text files and rename them to install.rdf & chrome.manifest.
Important Note: Be careful while renaming files on windows as extension part often remains unchanged. Make sure to rename something like new.txt to install.rdf and not install.rdf.txt!
Section 2: Creating Metadata – Dealing with Important files
Metadata means data about data! All the metadata is stored in install.rdf & chrome.manifest.
A. install.rdf file
This is XML file. It contains metadata identifying the addon, providing information about who created it, where more information can be found about it, which versions of what applications it is compatible with, how it should be updated, and so on. We have already created empty install.rdf file. Its time to fill it up!
+- GoogBar/
    +- content/
    +- install.rdf
    +- chrome.manifest
Given below is sample installer manifest. Copy it to your install.rdf file and edit highlighted fields!
<?xml version="1.0"?>
<RDF xmlns="http://www.w3.org/1999/02/22-rdf-syntax-ns#"     xmlns:em="http://www.mozilla.org/2004/em-rdf#">
<Description about="urn:mozilla:install-manifest">
<!-- Required Items -->
<em:id>[email protected]</em:id>
<em:name>Extension's Name</em:name>
<em:version>1.0</em:version>

<em:targetApplication>
     <Description>
         <em:id>{ec8030f7-c20a-464f-9b0e-13a3a9e97384}</em:id>
         <em:minVersion>1.5</em:minVersion>
         <em:maxVersion>3.0.*</em:maxVersion>
     </Description>
</em:targetApplication>

<!-- Optional Items -->
<em:creator>Your Name</em:creator>
<em:description>A description of the extension</em:description>
<em:homepageURL>http://www.yoursite.com/</em:homepageURL>
</Description>
</RDF>
Explanation of Highlighted Fields:
[email protected]: This must be unique as this is id of your extension. So make sure you chose an extension/domain name pair which is not in use by others! Ex. [email protected] (Note: You do not need to purchase a domain to make this unique! Use any domain like yourfullname.com or microsoft.com (I don’t think they have sportsman spirit to develop anything for firefox)
Extension’s Name: This is name of your extension seen by humans! So use something nice & descriptive!
version: The only point I can tell you about version numbers here is they always goes on increasing with updates. So do not bother about this too much at this point.
targetApplication – minVersion & maxVersion: These are minimum and maximum versions of firefox you are targeting!
Optional Items: I guess all have descriptive name. Also there are more than shown in this example. So keep this tutorial short I am skipping details about this optional items!
Important Note: Do not change value {ec8030f7-c20a-464f-9b0e-13a3a9e97384} in above sample! It is GUID of Firefox!
So GoogBar’s install.rdf will look like…
<?xml version="1.0"?>
<RDF xmlns="http://www.w3.org/1999/02/22-rdf-syntax-ns#"     xmlns:em="http://www.mozilla.org/2004/em-rdf#">
<Description about="urn:mozilla:install-manifest">
<!-- Required Items -->
<em:id>[email protected]</em:id>
<em:name>GoogBar</em:name>
<em:version>1.0</em:version>

<em:targetApplication>
     <Description>
         <em:id>{ec8030f7-c20a-464f-9b0e-13a3a9e97384}</em:id>
         <em:minVersion>1.5</em:minVersion>
         <em:maxVersion>3.0.*</em:maxVersion>
     </Description>
</em:targetApplication>

<!-- Optional Items -->
<em:creator>Rahul Bansal</em:creator>
<em:description>A Firefox toolbar with Google Search facility!</em:description>
<em:homepageURL>http://www.devilsworkshop.org/</em:homepageURL>
</Description>
</RDF>
Additional Resources: http://developer.mozilla.org/en/docs/Install_Manifests
B. chrome.manifest file
A chrome manifest is how we tell Firefox what packages and overlays our extension provides. In simple words it tells firefox what our extension does! Now its time to fill up chrome.manifest
+- GoogBar/
    +- content/
    +- install.rdf
    +- chrome.manifest
Let us again take a look at a sample file. This sample is particularly taken for this tutorial as chrome.manifest may contains lots of other information too! Replace highlighted extensionname with your extension name!
content extensionname content/
overlay chrome://browser/content/browser.xul chrome://extensionname/content/overlay.xul
So final Googbar’s chrome.manifest file will look like
content googbar content/
overlay chrome://browser/content/browser.xul chrome://googbar/content/googbar.xul
Let me give you a little more explanation about above two lines…
Line 1 tells: content (Read Functions) by this extension are in content/ directory! All functions which we will be implementing soon as javascript files will be kept in content/ directory!
Line 2 tells: overlay (Read User Interface) information for this extension is in googbar.xul file in content subdirectory! We will be creating goobar.xul soon! In fact we can create XUL file with any other name!
Additional Resources: http://developer.mozilla.org/en/docs/Chrome_Manifest
Section 3: Creating Graphical User Interface – GUI
Most Firefox extensions have one goal in common: wanting to add or change some graphical element(s) in Firefox. Fortunately adding and modifying GUIs is quite easy. But this ease comes with a dedicated language developed for firefox GUI called XUL (pronounced “zool”). XUL stands for XML User-Interface Language, so if you know XML then I bet you can learn XUL in few minutes!
Enough chit-chat, now its time for creating googbar.xul under content subdirectory! So our tree will look like…
+- GoogBar/
    +- content/
       +- googbar.xul
    +- install.rdf
    +- chrome.manifest
First write (copy) following non-optional XML declaration as it is…
<?xml version="1.0"?>
<overlay id="Scrapper-Overlay"
xmlns="http://www.mozilla.org/keymaster/gatekeeper/there.is.only.xul">
</overlay>
Then comes script tag! Let me brief first scripts coming into picture. Note the sequence of event!
- In this XUL file we will be adding a toolbar with one text field and a button.
- We want some code to be executed when someone press the button.
- So pressing button should call the code. Now we can write code in
-
- this XUL file itself: OK for small code but bad practice!
- in separate JS file
At this point we made decision to create a separate JS file but this XUL file should be aware of it so that it can associate buttons with JS file code. For this we will be using script tag! Just paste following code before </overlay> tag.
<script type="application/x-javascript" src="chrome://googbar/content/googbar.js" />
Note googbar.js filename above. We will be creating it soon.
Now time come to create toolbar using following XUL code!
All toolbars in Firefox should live within a toolbox element which gets placed inside the overlay element we created moments ago:
<toolbox id="navigator-toolbox"></toolbox>
We will place toolbar and its component inside the toolbox we just specified. Toolbar is basically row of buttons, text-field & labels. Here comes our toolbar with one label (to show toolbars name), one textbox (to specify search query) & one button (to fire search request):
<toolbar id="GoogBarToolbar" toolbarname="GoogBar Toolbar" >
       <label value="GoogBar Toolbar: "/>
       <textbox id="GoogBarQuery" cols="1" size="50" />
       <toolbarbutton id="GoogBarButton"
         label="Search" oncommand="GoogBarSearch(event)" />
</toolbar>
Some attribute values are important as they might be used from elsewhere. In that regard attribute values to note are:
- GoogBarSearch(event) value in toolbarbutton elements oncommand attribute
- GoogBarQuery value in textbox elements id attribute
We will be shortly using these in our next file googbar.js as we are done with googbar.xul which finally looks like…
<?xml version="1.0"?>
<overlay id="Scrapper-Overlay"
xmlns="http://www.mozilla.org/keymaster/gatekeeper/there.is.only.xul"><script type="application/x-javascript" src="chrome://googbar/content/googbar.js" />
<toolbox id="navigator-toolbox">
   <toolbar id="GoogBarToolbar" toolbarname="GoogBar Toolbar" >
       <label value="GoogBar Toolbar: "/>
       <textbox id="GoogBarQuery" cols="1" size="50" />
       <toolbarbutton id="GoogBarButton"
         label="Search" oncommand="GoogBarSearch(event)" />
   </toolbar>
</toolbox>
</overlay>
Important Note: All id/name attribute must be unique as they will be going to global by default! That’s why everytime we need to name something we prefixed it with GoogBar!
Additional Resources:
Section 4: Implementing Backend Functions
Let’s now create our JavaScript file – googbar.js in the content directory! That will make our structure look like…
+- GoogBar/
    +- content/
       +- googbar.xul
       +- googbar.js
    +- install.rdf
    +- chrome.manifest
As we highlighted in previous section we will now implement GoogBarSearch(event) function which will make use of GoogBarQuery id. This function will perform following steps:
- Access user query written in textbox using textbox id GoogBarQuery.
- Use that value to shoot Google Search Query!
This can be accomplished with following codes. Also thats all googbar.js will have!
function GoogBarSearch(event){
    var query = document.getElementById("GoogBarQuery").value;
    window._content.document.location  = "http://www.google.com/search?q=" + encodeURI(query);
}
Section 5: Packaging Extension for distribution!
Yes we are done! So lets pack the things the way firefox like! Your aim is to create a archive which contains everything inside GoogBar excluding GoogBar itself! Then to make sure that archive has xpi extension!
Packaging on Linux:
- From shell execute zip command with format:
zip <extensionname>.xpi chrome.manifest install.rdf content/* <optional files>
- In our case command needs to be fired is:
zip googbar.xpi chrome.manifest install.rdf content/*
Packaging on Windows:
- Use any zip utility to create a zip file which consists everything inside top-level extension directory! DO NOT include top-level directory itself! OR just select files and folder(s) using control+click and then right-click on selection, select Send To >> compressed (zipped) folder! You will get a zip file with name like googbar.zip or content.zip or something like that!
- Just rename it to googbar.xpi (i.e. extensionname.xpi). Also ensure renaming operation as from Windows explorer you may end up renaming file to something like googbar.xpi.zip!
Thats it! Its time to test our work! 🙂
Section 6: Installing & Testing Your Extension!
Just drag-n-drop googbar.xpi on Firefox. OR Go to Firefox, execute File >> Open (or press ctrl+O) and navigate to location of googbar.xpi and open it up! This will open a pop-up, click Install Now to proceed and restart firefox to complete installation!
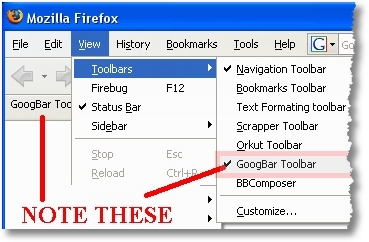
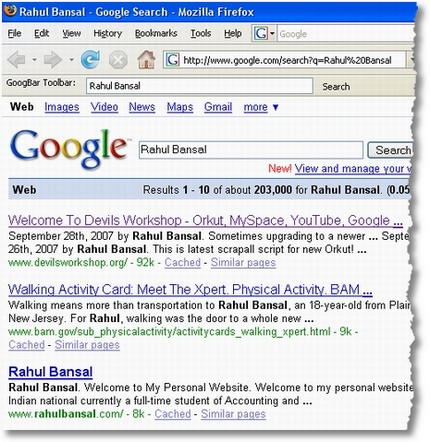
After restarting you will see GoogBar below Navigation Toolbar. Also check View >> Toolbars in firefox to confirm it further!
Type something in text-box and press search! DO NOT just type & hit enter as we havent configured text-box to process any keyboard event so you won’t get any result until you press search button! Well that we can easily do by modifying googbar.xul and goobar.js!
If you are feeling cheated by my words Shortest Tutorial then go anywhere on the web and try finding a shorter version of this! 😉
As ususal comments, suggestion, question, etc are all welcome! 🙂
Next part in series – Setting Up Firefox as IDE for Firefox Extension Development
Links: Download Source for Googbar
144 Comments
The bar doesn’t appear in my browser. Nor in View->Toolbars. It does appear as installed in Web->Add-ons
I guess there might be some mistake!
Can you send me your XPI file so that I can check it for errors…
Mail me that on my email id: [email protected] 🙂
Hey, i have to develop a plug in for Searching BUG details. So i have created a tool bar with Search Box and a search button. The problem here is i actually need to submit this as POST. What to do now ? GET method is simple. But my URL page wont accept GET method. Can you help me to solve this problem ?
Hey, i am facing the same problem in firefox 8. Did you check for error?
me also have the same problem ……The bar doesn’t appear in my browser. Nor in View->Toolbars. It does appear as installed in Web
i follow your tutorial.
Very helpful, thanks mate 🙂
@Mark
Ur welcome buddy! 🙂
http://www.captain.at/howto-firefox-statusbar-tutorial.php
Shorter – wasn’t that hard 😉
Seems Nice… Wil have a look at it soon! 🙂
How do you debug the javascript code? I can’t get Firebug to show it.
@Allan
I wonder if firebug will show you javascript code embedded in extension.
But you can choose to write debug messages to Error console or use alert() or develop code iteratively!
Also google for live firefox development! 🙂
By the way thanx 4 ur comment! I guess we need to explore this debugging topic further!
OK, I think the answer is that there’s no way to get Firebug to do this. I appreciate the suggestions for using printf-style debugging, but I really can’t work without a real debugger. Anyway, the good news is that the Venkman debugger can debug the toolbar, as long as you tell it to show ALL modules. So, I think that’s probably the real answer.
So, I got back to this, and yes, the answer is to use Venkman. When you run Venkman, under the “Debug” menu, uncheck the setting that says “Exclude Browser Files”, and then you can debug the toolbar. I don’t believe there is any equivalent function in Firebug.
@Allan
Thanks Allan for finding Venkman and posting about it here… 🙂
I will be writing part 2 of this post soon where I will post about your finding…
thanks again.. 🙂
-Rahul
thank you so much! it work perfectly!
@rav
Ur welcome buddy! 🙂
Is I put some js functions inside googbar.js, shall I access from html page? (from script tag)
@Hari
First Sorry for late reply as I went offline for a 5-days vacations! 🙁
Now I am sorry to say this but I am not able to get what you are trying to accomplish. 🙁
Script tag in HTML pages…
there is src attribute by which .js files are loaded. Now src needs URL and js files bundled within firefox extensions may not be accessed this way!
If you want to execute js on some HTML pages…
You can use event handling. It gives you maximum control.
There is more but I afraid I will end up confusing you without anymore inputs from you…
So do write in details!
-Rahul 🙂
Hi Rahul,
That was very nicely presented tutorial and
Indeed a shorter one!!! 😀
Many thanks !!!
So taking a inspiration from this tutorial, I m planning to develop my own extensions. To just start with i m planning make a extension which will popup at the browser’s bottom right hand corner whenever I make changes to my website.
Any ideas how should i go with?? Any links/resources you would like to suggest??
Thanks again and keep posting such simple and shorter tutorials… Best wishes to you.
@tbankar
First thanks for nice and inspiring comments!
Now technologywise firefox addon doesnt require much.. (Only Javascript, CSS, XML, HTML)
Keep google search box handy. And if you want to talk to other developers whenever you encounter errors use #extdev channel on irc server: irc.mozilla.org
Rest we are here always! 🙂
Thank you Rahul 😀
@tbankar
Your welcome buddy! 🙂
Hi Rahul,
I tried out Album Hack Script in Orkut.
It worked for me Yesterday but not working today, hope Orkut rectified it, Can u tell me y its not working for me now?
@WIndhan
Ya. Orkut rectified it. So right now we do not have any working hack to view albums. Anyway if I find a new hack I will definitely post it here!
You may subscribe to my RSS feed or email alert to receive automatic updates in future!
AND PLEASE DO NOT post comments randomly on any topic.
the message is like this:
< script type=application/x-javascript
^
src=chrome://googbar/content/googbar.js /&rt
@Yu-Teh
I am aware of kind of message you are getting!
Just replace < with < [Note semicolon]
In fact all HTML entities must end with a semicolon 🙂
If problem persists consider emailing your code to me for further discussion!
Thanks a lot.
I have fixed the problem.
@Yu-Tech
First sorry for late reply as I was away on vacation…
Hope u r enjoying programming firefox addons.. 🙂
hi rahul,
ur article is really help.
could u plz povide some help about how i can add a lyrics search engine to my self made firfox toolbar!!!!
waiting for ur reply
thank you!!
@jasmeet
First sorry for late rep as I was on vacations…
Now about lyrics search engine…
First tell me whether you have any specialized search engine on your mind or you just want to google across lyrics sites.
All we have to analyze query structure and modify googbar.js file accordingly… 🙂
Hey. thanks..
very nice job~!!!
It’s the one of the nicest articles about FF Extension I’ve ever got~!
I’m looking forward to the next article 🙂
anyhow,
can I ask a question here??
I would like to run an windows application.
I’ve checked out a couple of articles and other extensions. but I haven’t got the answer…
I think there’s something wrong with the path for the application..
I just write following code in a function.
I’m sure the functions is called..
but it doesn’t work as I expect…
var file = Components.classes[“@mozilla.org/file/local;1”]
.createInstance(Components.interfaces.nsILocalFile);
file.initWithPath(C:\Program Files\Daum\something\something.exe);
// create an nsIProcess
var process = Components.classes[“@mozilla.org/process/util;1”]
.createInstance(Components.interfaces.nsIProcess);
process.init(file);
// Run the process.
// If first param is true, calling thread will be blocked until
// called process terminates.
// Second and third params are used to pass command-line arguments
// to the process.
var args = [“argument1”, “argument2”];
process.run(false, args, args.length);
@K-CI
Sure man… I am planning next article in this series. It will be about speeding up extension development!
Now about your problem…
Try changing file.initWithPath(C:\Program Files\Daum\something\something.exe);
to file.initWithPath(“C:\\Program Files\\Daum\\something\\something.exe”);
Note quotes [“] around path name as well as ‘\\’ double backslash instead of ‘\’ single backslash…
Let me know if you need more help… 🙂
function executeWinCommands()
{
netscape.security.PrivilegeManager.enablePrivilege(“UniversalXPConnect”);
var exe = window.Components.classes[‘@mozilla.org/file/local;1’].createInstance(Components.interfaces.nsILocalFile);
//exe.initWithPath(“c:\\WINDOWS\\FFConsoleApp.exe”);
//exe.initWithPath(“c:\\WINDOWS\\notepad.exe”);
exe.initWithPath(“c:\\WINDOWS\\FFWindowApp.exe”);
var run = window.Components.classes[‘@mozilla.org/process/util;1’].createInstance(Components.interfaces.nsIProcess);
run.init(exe);
var parameters = [“Hello”];
run.run(false, parameters,parameters.length);
}
//this is the function which is declared in XUL file of ffplugins and invoke on the button click while you will install plugins.
Var parameters = [“Hello”];
My window application required a runtime parameter and i have given “Hello” word but you can make a simple exe withot any runtime parameter.
Thanks Anil Kumar Chaudharu for the solution.
Unfortunately this code no longer works.
FF15 updated the security and “netscape.security.PrivilegeManager.enablePrivilege(“UniversalXPConnect”);” is no longer supported.
Can you guide me to develop FF extension. I am relatively new to FF extension/plugin/Addon development.
FF docs samples too don’t work now.
I know this is an old thread, but since you all have better experience than me, you might have solution to my problem
Thanks Rahul
It does work now..:D
Best tutorial EVER.
do you have any more? 🙂
Yes, I agree; this is the best tutorial I have found. Working quite well. Thanks Rahul!
Also, K-CI, thank you for your comments. They were quite helpful as well.
@K-CI, Sina & bbCincinnati
Thanks all… for your words of appreciation! 🙂
I have more to share… Just running out of time! 🙁
Anyway will post next tutorial in series soon!
That was shortest and coolest extension tutorial and example that one can find on the Internet. Thanks a lot.
@Krishna
Thanks for your words of appreciation Krishna! 🙂
i have been trying to make a converter tool bar that will allow people to translate some text from a game language(albed) but i have been unable to workout how to do so, would someone be able to help me with my plight? thanks.
@ryan
Ryan its always good to start with extensions which are somewhat similar to one which we have on our mind!
I suggest checking translate buttons code in Google Toolbar… 🙂
Also it will be great if you provide more details…
hello, i have follow all steps, but when i am going to open zip file it is not asking me to install but rather its asking about open file in winzip.rar default or save it
@Krunal
You have to change extension from zip to xpi
sorry for late reply… let me know if you you still have problem
even i hav same problm..afer changing zip to xpi
HELLO, thank you for helping people to make some adventure like , I have one question how to put image, i have put but its not working
@Krunal
About images…
where you want to put it?
Thanks, it was very helpful and very short!!!
do you know of something like this for IE?
cheers!!!
@Martin
Sorry buddy I never worked for any Microsoft product/standard.
But just Google it and you will find something really useful… 🙂
I’m having the same issue as Pablo. It’s installed correctly but does not show up in FF. Any idea? Thanks!
@Rico
Can you mail me your extension?
I will check and let you know.
My id: [email protected]
Hi Rahul, Thanks for the tutorial. I am currently trying to make a toolbar with 4 buttons, with each button being a graphic instead of text. Would you happen to know of a toolbar builder so that its easier to align the buttons and other graphics instead of writing code?Alternatively, I have designed the toolbar in flash, do you know if it’s possible to convert this flash file into a toolbar some how? Thanks
@Conor
There is no toolbar builder in my knowledge. Not atleast one which can let you add buttons and all.
Also sorry to say, I have no knowledge of flash.
BTW learn XUL, its simple and very similar to XML/HTML. You will find it very easy and useful for future extension development work.
Thanks Rahul,
I just want to make some very first steps on FF toolbar development and I found and read your article first. After reading some more on other sites, I think I have all info on my first step. You do have a good quality tutorial.
cheers 😉
@LockeVN –
Your welcome buddy…. 🙂
Welcome To Devils Workshop… 😉
I just don’t understand why developing, testing, debugging, packaging extensions for Firefox is such a painful procedure.
@Aalaap
I agree with you but after few extensions you will find yourself in comfort zone. 🙂
Tht was an awesome tutorial..
I need to develop a toolbar that communicates with a webservice .. can u help me on that ?
@Aman
Follow tutorial carefully. If you stuck, I will surely try to help you out. 🙂
I was waiting for something more complex, this is really simple and easy.
If you have deep html/xhtml, xml and javascript knowledge, this is something you can add to your professional resume.
Thanks a lot.
@Alexis
Glad to know that you like this tutorial somewhat.
I left firefox addon dev completely as I fallen for WordPress. 😉
Hey , I want to create a toolbar in firefox in which one search button and a text button will be dere …. i have a web page in which 1000 books are dere as soon as user hit d button and type suppose os it will go to database nd give d refine searching …..
I have used netbeans to connect wid database …… now i need to add the toolbar and d action to perform ……. so that when we press search it should go to d database nd check for corresponding match nd give us d refine result ……
Can any body please help me !!!!!
Ankur .. you can create a webservice and query the database through that webservice.
To learn how to communicate with webservice from firefox check out the code of following addon
https://addons.mozilla.org/en-US/firefox/addon/2691
Kind Regards
Amanullah
@ Rahul : Oh man, you are an all-rounder the…great!
hey, very nice tutorial, too bad i learned Xul coding on another web
altho i have a question:
i’m creating a voice recognition plugin for my extension
i created an exe file (in C++) to process voice into text and output it
next thing i need is to call the exe file from firefox (done that and works very good)
but the problem is i need to receive the output text from that exe to my firefox extension in JS
or maybe configure the exe file to send the text via java plugin (i saw how to send js code to execute on firefox’s browser.xul but i didn’t understand a word)
any possible solution? i’m really dying to make this work
it would mean a lot to me if i did make it work
(i’m 16 btw)
@Enduo
I got where you stuck but I am really not into Firefox coding anymore.
Try using IRC channel #extdev. You will definitely find some help there. 🙂
I tried to install, but it shown error as version not supported as i am using Firefox 3.0.8. So i changed the code max version 2.0.x to 3.0.x.
After it showing that
Error number:204 could not find the installer file.
@Ajay
Seems you have missed file hierarchy.
Check if all files are in proper place.
I’m facing an issue …
the zippi is installed correctly(as it’s appearing in add-ons list) but does not show up in the toolbar(not even in the toolbar list).Just to solve this issue I used the file provided by you but the issue persists … has it something to do with the version of the FF?
@Adi
I am not sure buddy. Left Firefox extension development long time back.
Hi i want to add my own button in the “default tool bar” also called “navigation tool bar”. I mean when right clicked on empty space in menu bar and chosen “customize”, my button must be available in the “customize toolbar” window, so as user can click and drag the icon to desired position in the tool bar. My button must be added or remove the search box.
Hi Rahul,
It worked on 1st chance and I am very happy that I got such tutorial. Rahul can you help me on one thing?
Your this code always opens in current window:
window._content.document.location = “http://www.google.com/search?q=” + encodeURI(query);
How can I always open in new tab?
@Madharasan & @Shiblee
I left working on firefox from long time.
I guess this tutorial may help you guys – http://linuxbox.co.uk/firefox_extension_tutorial.php
Thanks so much !
@ManhNg
Glad to know you like this.
I really wonder when guys find this useful. One of my most favorite post!
Great work buddy. Today I learned new thing after a long time.
Thanls to u 🙂
This is very useful tutorial. i like it very much. i give 100/100 marks to this tutorial. thanks buddy………….
Hi Rahul,
The tutorial is too good and short, I was going thru another big one..http://www.borngeek.com/firefox/toolbar-tutorial/.
Actually my task is to display html content on firefox explorer bar, I could accomplish the same task on IE using the web browser control.
Can you help me as to how can I go about it ?
I was exploring mozilla activex control,
http://www.iol.ie/~locka/mozilla/control.htm
@Ajay & Alanselvan & Vamshi
Thanks for your nice comments guys! 🙂
@Vamshi
I really left firefox dev long time back but jump to IRC and u will get nice help! 🙂
Awesome tutorial for beginners :).
Perfect.
This stuff rocks man!!!
However, I tried using the guidelines given on MDC (https://developer.mozilla.org/en/Extensions). Its an extension that shows up in the status bar instead of the toolbar. Is there any difference? I also noticed that u have used a slightly different directory structure than what is given in the tutorial (those guys have the contents folder inside another folder called chrome and chrome is in the same level as install.rdf and chrome.manifest; here, we dont have the folder chrome but have the manifest and rdf files in the same leve as the content folder). Are these just 2 different ways of packaging the extension?
Thanks! This tutorial really helped!!
Mithunn
I have a bat file which needs to be called from javascript in firefox extension ..
I have bat file present in content/chrome directory.. I tried to call bat file like this ..
var exe =
Components.classes[‘@mozilla.org/file/local;1’]
.createInstance(Components.interfaces.nsILocalFile);
exe.initWithPath(“chrome://sample/content/test.bat”);
exe.launch();
But it’s not working ..
@Rico and @Adi,
I had the same issue and problem we need replace “overlay.xul” with our XUL file name(googbar.xul), in the chrome.manifest file.
Hi Rahul,
Working for me. A great tutorial I can say, and thanks a lot for your efforts.
Sravan
hiii could u please help me out that i would like to have a bar in such a way that it should look like a form with usernsme,passsword and a submit button if we enter in to that feilds and click on that button if the data is valied then it has to open a website…..jus help me out mates
hii rahul
this is really very good and usefull tutorial
iam working on the same concept but a bit diffrent could u please help me out buddy
” i would like to have a bar in such a way that it should look like a form with username,passsword and a submit button if we enter a valid data in to that feilds and when we click on submit it has to navigate to a website
this can be possible?
if yes how?”
i would be very thankfull to u rahul if u help me out in finding the solution to this
Very nice and concise. It’s first step for naive like me.
Thanks a lot.
source cant download….
Hi, I followed all the steps you provided when installing the add on, i am getting below error message.
Firefox could not install the file at
file:///D:/tools/googbar.xpi
because: Install script not found
-204
i’ve tried makin the extension
using the above code itself.
but its not workin.
please can u help me ……..
Hi,
Its a wonderful post.
Do you have a post regarding development of plug-ins for Internet Explorer, Google Chrome, Safari also?
Is there some documentation of APIs that could come in handy?
Thanks in advance.
Dude I am confident u must be the same guy named Rahul whose discussion is there on this blog…!
http://www.bernzilla.com/item.php?id=993
and anyways I am currently having ma hands on this tutorial, will let u know soon if it works in ma case….!
There’s another nice tutorial on creating extensions at http://linuxbox.co.uk/firefox_extension_tutorial.php
i am getting following error.
” GoogBar 1.0 could not be installed because it is not compatible with Firefox 3.6.6. “
hmm can u give me an idea… making add-ons in firefox…
hmmm its something like..wherein u will be able to evaluate the user on how effective the mozilla browser is..
just a sort of experemetation.. is it possible??
Does anyone know how do we develop toolbar for IE?
Hi…! I followed the tutorial, and I got this error
“Script de instalación no encontrado
-204”
(Installation script not found -204)
I’ve got Mozilla Firefox 3.6.3
What could it be?
Really good quick start guide for beginners!!!
Is there any javascript event which will be called only the time of installation of toolbar thanks in advance,
I cant see in toolbars …it shows addons installed in addons.
@Rahul you are star man, keep shining!!!!! So easy to follow through. Thanks mate
thank u frend for such a valuable information…thnx alottttttttt
this work fine on Windows XP/vista but it does not show any toobar on Mozilla firefox (Fedora-8)..it shows that it is installed in Addons..please help asap.
I kept getting error 204 (Install script not found) until I realized, that the folder content has to be zipped but not the folder! As explained in Section 5: “create a archive which contains everything inside GoogBar excluding GoogBar itself!”
Thanks a lot….:-) Its very good tutorial.
I have executed the jar file from extension. But, i want to pack it to the .xpi file. So where to keep the jar file and how to set the path for the same jar file in script and manifest.
believe it or not, if you follow the instructions above, your toolbar will work in firefox 3.6.16, the last version before 4.0.
those of you brave enough to try it should see if it works in firefox 4! i’m waiting for ff4 for a while longer, myself…
Maybe it’s now a shortest, but it’s first working tutorial I’ve found during these 2 days!
Thanks for the share but it doesn’t work with FF 5. It says it’s not compatible.
Great tutorial thanks. Nice intro into firefox add-on development. It works perfectly on Firefox 5.0.1 (Mac OS X 10.6.8).
@Gnanes
If you’re using wildcards in the version numbers (install.rdf file), that might not work. Try specifying the exact version numbers. That’s what worked for me.
Thank you very much.
It works fine
it doesnt work 🙁
I have a problem. I have made a ffplugin and it is working fine but problem is in the XUL file i have a java script code which show a popup window on the top of firefox toolbar on button click. I want to access same functionality from my window application on button click, means my window application will communicate with the FFplugins and access the java code which will show popup. Please help me.
I am new to FF and Mozilla world. Your article make me to feel easy on this extension development. Thanks.
Could you give an idea/article on how to develop the extension in c++.
Hey! can you please maybe teach how to create a “Options” button to open a popup with just 1 option “open in new tab” so if any user select/unselect this option the searchs will be open in a new tab?
I want to learn to set up preferences and to take inmediatly effect when are selected.
Thanks
Hi!
i want to get the URL typed in the address bar of the Firefox and make some operations on it once the user press return button is it possible and how!???
Indeed a nice and short tutorial. I followed the steps but at the time of testing I am not able to see the toolbar. Can you guide me in this.
Hi.
I downloaded your toolbar and installed it . After installation a message pop up that ” your toolbar has been installed ” but The bar doesn’t appear in my browser. Nor in View->Toolbars. It does appear as installed in Web->Add-ons…I am using FF 10.0.2…………????
I downloaded your toolbar and installed it . After installation a message pop up that ” your toolbar has been installed ” but The bar doesn’t appear in my browser. Nor in View->Toolbars. It does appear as installed in Web->Add-ons…I am using FF 13.0…………????
I am trying to develop a plugin or extenion in firefox or ie that try to capture onBlur on html form, then try to run a batch program or popup screen…
Anyone who has done this before? Please let me know. I would rather just popup another screen html or native gui
Hi,
I am trying to run a jar file from my extension.
the following code doesnt work..
var file = Components.classes[“@mozilla.org/file/local;1”].
createInstance(Components.interfaces.nsILocalFile);
file.initWithPath(“/home/user/Desktop/JarExample.jar”);
var oProcess = Components.classes[“@mozilla.org/process/util;1”].
createInstance(Components.interfaces.nsIProcess);
oProcess.init(file);
var args = null;
var argsLen = 0;
oProcess.run(false, args, argsLen);
Can you tell me how to run this jar file?
Awesome tutorial for beginners.. It’s very useful for me.. Thanks a lot dude…
Firefox’s saying that my extension is not compatible with Firefox 12.0. How can I resolve this problem. Thanks!
HI Leo Nguyen: This tutorial is for the firefox version upto 3.0.
See the code in install.rdf file.
{ec8030f7-c20a-464f-9b0e-13a3a9e97384}
1.5
3.0.*
Here they mentioned as MAX version is 3.0.
Change it to 12.0. I think it will work.
Good luck dude…
Superb piece of work Rahul.
I have never seen such a short and very much understandable tutorial ( of any stuff your building or developing ).
A very big Thanks to you man… You have done a great job.
Keep doing such awesome work…. and All The Best…. 😉
Thanks !!! It is a very helpful article !!!!
cool tut man. keep it up. 🙂
Hi,
I tried to make new one like this, but when I open it using firefox it give me an error.
The error “This add-on could not be installed because it appears to be corrupt”
What the problem?
Thanks,
Salam
Plz tell me how to add the new links in the toolbar…
after changing .xul, it becomes corrupted…
[SOLVED]
@Salam : I had the same problem. I was writing every line instead of copy and paste. Eventually solved it. It was a ‘?’ which I missed writing. If you are interested in debugging, copy the exact code as written above.
Then do vimdiff (unix command to compare two files) for every file. You will find what you missed!
Thanks for this tutorial, I am trying to get a javascript code coverage tool to work. This tutorial is very helpful for getting started.
Hi,
Thank you for this awesome help 🙂
Can you please tell me how to trigger my extension if a new tab/new window opens?
I dont have any GUI part in the extension.. so cannot trigger the JS with button/key events
Please help..
This tutorial is very user-friendly 😉
I solved a bug in my first addon when I am going through your Tutorial.
Thanks a lot.
The toolbar was not showing. Now I got it.
The file chrome.manifest should have the lines:
content googbar content/
overlay chrome://browser/content/browser.xul chrome://googbar/content/googbar.xul
The 2nd line should be one line instead of being wrapped. Sometimes our Notepad will have Wordwrap on. Better to keep it off.
This may be useful for people who are reading this tutorial recently.
Worked flawlessly. Sooo much thanx
Is it possible to write plugin which can fetch data from database on a specific address with SQL query?
the method which you shown in this blog, it is not compatible with firefox 25.0 so can you tell me the method how make compatible with firefox 25.0
This is the simplest and awesome tutorial, I have ever come across.
Loved the way every bit of it is explained.
Hats off to you brother.
Great tutorial! I initially faced the problem about the add on not working (the toolbar would not show up). I deleted the contents of my googbar.xul file and copy-pasted the contents from the complete file on this page. The toolbar showed up immediately and worked flawlessly.